Looking for a charming DIY project that adds a touch of warmth and whimsy to your living space? Look no further than the easy light-up heart! This delightful project combines creativity with a dash of romance to create a stunning piece of decor. Whether you’re sprucing up your bedroom, adding flair to a special occasion, or simply indulging in a creative endeavor, this light-up heart is a fantastic choice.
Materials You’ll Need:
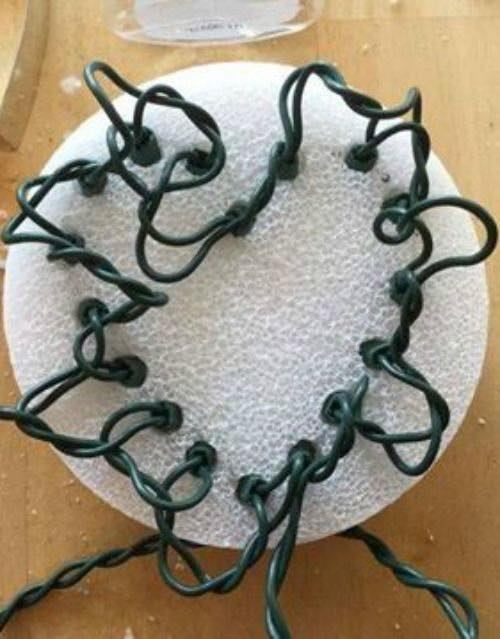
- Cardboard or Foam Board: Choose a sturdy material for the heart’s base.
- String Lights: Opt for LED string lights, which are safer and more energy-efficient.
- Pencil and Ruler: For drawing and measuring.
- Craft Knife or Scissors: To cut the heart shape.
- Acrylic Paint and Brush: To decorate the heart (optional).
- Clear Tape or Hot Glue Gun: To secure the lights.
- Hooks or Adhesive Wall Strips: To hang the finished heart.
Step-by-Step Guide:
1. Design Your Heart:
- Start by drawing a heart shape on the cardboard or foam board. You can use a template or freehand it if you’re feeling artistic. Make sure it’s the size you want for your project.
2. Cut It Out:
- Carefully cut out the heart shape using a craft knife or scissors. Take your time to ensure clean edges.
3. Decorate (Optional):
- If you want to add a personal touch, paint or decorate your heart. You can use acrylic paint, glitter, or any other materials that inspire your creativity. Let it dry completely.
4. Plan the Light Placement:
- Lay the string lights on your heart to determine where you want them to go. You can create a simple outline, zigzags, or any pattern that pleases you.
5. Attach the Lights:
Please Head On keep on Reading (>)